Indexing your Spark Plugs
The common method to indexing spark plugs involves marking the spark plug and then installing it. Observing the mark will indicate if the plug is indexed in the correct position. Normally people will index them to the intake valve. You could try a different plug or there are shim kits that can be used to back the plug out a few degrees to get the right orientation.
There are several manufacturing variables that will determine where the ground electrode is facing when spark plug is installed in the head.
- Alignment of the spark plug threads when they tapped the cylinder head.
- Where the ground electrode was placed on the spark plug.
It is easy to see that every plug and each cylinder can be different from one to the next.
There is a lot of debate as to whether or not spark plug indexing is worth the effort.
Well I would not spend the time and the effort that is required for the shim method or anything that requires repeated installation and removal of the plugs.
But I would do it if it only took like 5-10 extra minutes while normally changing my plugs.
Below I have outlined a more practical solution.
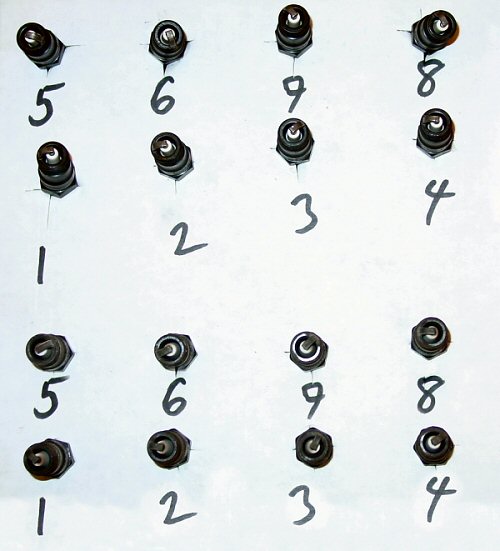
- Get a cardboard box and cut enough X's in it to hold two sets of plugs for your car, one set for the old plugs and one set for the new plugs.
- Number the slots so you can keep track of which cylinder the old ones came out of.
- Now remove your old plugs and keeping them in order, push them into the X's with the electrode grounds facing up.
- Take your new plugs after you set the gap and place them in the second set of X's.
You will end up with something like this.
Remember to keep them in order. You need to know which old plug came from which cylinder.
- Now look at the threads of the plug, notice the very first thread that would start into the head. Right where it tapers down flush with the body of the spark plug, this is the beginning of the starter thread.
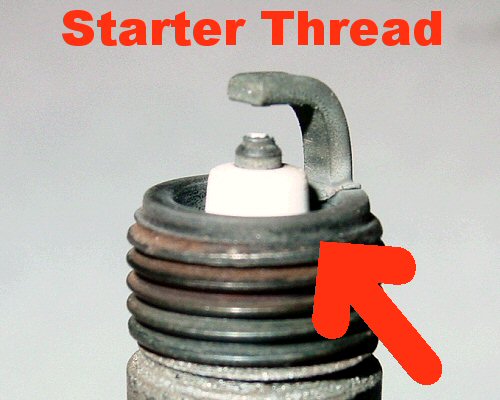
- I turn the plug till the very beginning of the thread is at the 6 O'Clock position in the holes. Go ahead and turn all the plugs in this manner old and new. If you want a better visual you can put a line of whiteout on the beginning of the thread.
Note. Naturally all of the grounds are going to be pointing in different directions, that is fine.
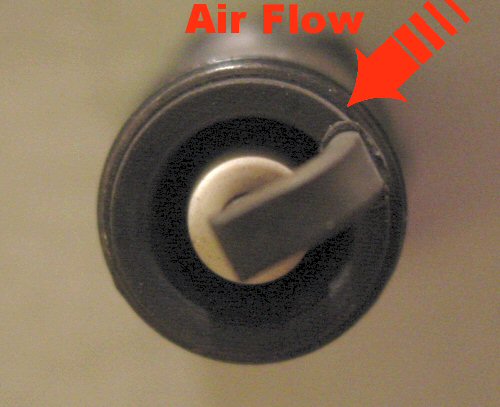
- You should be able to see one side has deposits on it and the other sides of the plug is fairly clean.
This is the direction or path that you want to make sure that the electrode ground is not blocking.
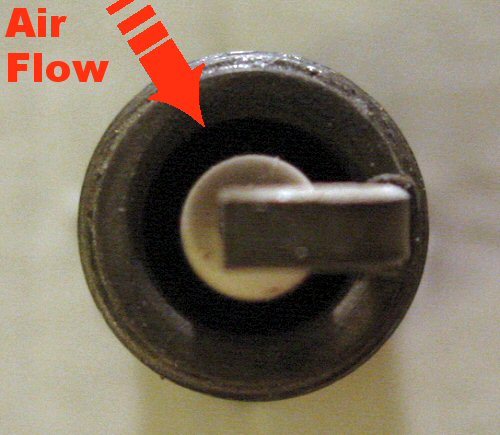
If you see the deposits are right up next to the ground electrode or blocked by it then the electrode ground was blocking the fuel/air path. This is what we are trying to avoid.
- Now since the plugs are all indexed on the box with the starter thread at the 6 O'Clock position we simply need to look at the used plug, note from which direction the deposits formed and pick a new plug that the ground electrode does not block the air flow from that direction.
- Leave the used plugs in place. As a back up you may want to take a permanant marker and mark the cylinder number on the plugs themselves.
- To make it easier you can draw on the box which direction the air flow is coming from.
You can keep the box and have a new set of plugs all ready for installation the next time you change your plugs.
- From the new plugs side, remove the plug from the first cylinder you want to index. Look at the old plug for that cylinder and pick the plug that does not block the air path. If you are indexing a V8 you have 8 plugs to choose from.
- Do the same with the next cylinder.

- You may have to go through and switch a few out again once you get down to the last couple of plugs.
Try to keep the ground electrode on the opposite side of the path but when you get down to the last few plugs you may have to keep switching them around so some may end up less than exactly opposite the air path. You could buy extra plugs so you would have more choices to pick from.
- Continue until you have all the new plugs matched up with a cylinder. Now go back and check your work. Make sure all the plugs starter threads are at the six O'clock position. Make sure the direction of the air path is not being blocked by the ground electrode.
- That is it, simply install the new plugs in their identified cylinders the way your normally would.
The whole process will only add about 10 minutes to changing your sparkplugs. Out of the 8 sparkplugs, I had 4 that were partially or totally blocked by the electrode ground.
If the neighbor Vern knocks on the door wondering why your hood is up, don't answer it....the odds of him either switching the plugs on you or dropping one is very high.
NOTE: There is one variable that should be a very close manufactures tolerance. And that is the distance from the start of the threads to the shoulder where the spark plug contacts the head. If some how you are using spark plugs that the physical reach is different than the plugs you are installing then you would need to just install the new plugs. Run them for a few days to develop some deposits on the plug and then remove them and then follow the steps above.
©2021 BULLITT Archive:
Mustang and Mustang Bullitt are registered trademarks
of the Ford Motor Company. All other trademarks are
property of their respective owners
|
